How to use ColorBeta?
Gradient
- Add
- Hide
- Edit
- Select
Add a new gradient / layer
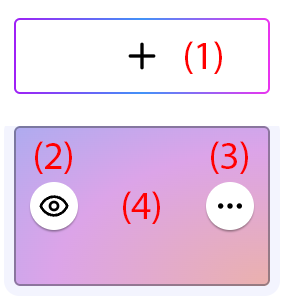
On the right sidebar, click on the "+" button (1), then select the gradient type (either linear, radial or conic). You can change this at any time by editing the gradient.
You can add as many layers as you like and stack them to create a beautiful, unique gradient.
Select a gradient
On the right sidebar, just click on the layer. You will be able to:
- Change the gradient colors.
- Modify its position, orientation, size, etc. (depending on gradient type)
- Edit the background properties.
Edit a gradient
On the right sidebar, hover over the layer and click on the "···" button (3). You will then be able to:
- Change the gradient type.
- Delete the gradient (you'll be asked to confirm your choice).
- Duplicate the gradient.
Reorder the gradients
If you have added multiple layers, you can reorder them. Click on a layer (4), then move it above or below another one.
Linear gradient options
You can change the orientation of this type of gradient by selecting a "direction" (top, top right, bottom, etc.) or an "angle". Unlike "angle", "direction" will adapt to the dimensions of the parent element.
Note that the directions "top", "bottom", "right", and "left" correspond to angles of 0°, 180°, 90°, and 270°, respectively.
Radial gradient options
You can choose between an ellipse, a circle or a shape with a custom size. Unlike the "circle", which will maintain a constant proportion to keep the shape of a circle, the "ellipse" will adapt to the dimensions of the parent element.
If you select an ellipse or a circle, the size of the shape will be determined by the coordinates of its center point:
- Farthest-Corner: The shape is adjusted to reach the farthest corner of the container. It maintains the same ratio as with Farthest-Side. This is the default behavior.
- Farthest-Side: It is adjusted to reach the farthest side of the container.
- Closest-Corner: It is adjusted to reach the closest corner of the container. It maintains the same ratio as with Closest-Side.
- Closest-Side: It is adjusted to reach the closest side of the container.
Conic gradient options
You can change the orientation using an angle value. As with radial gradient, you can also change the coordinates of the center point.
Color Stops
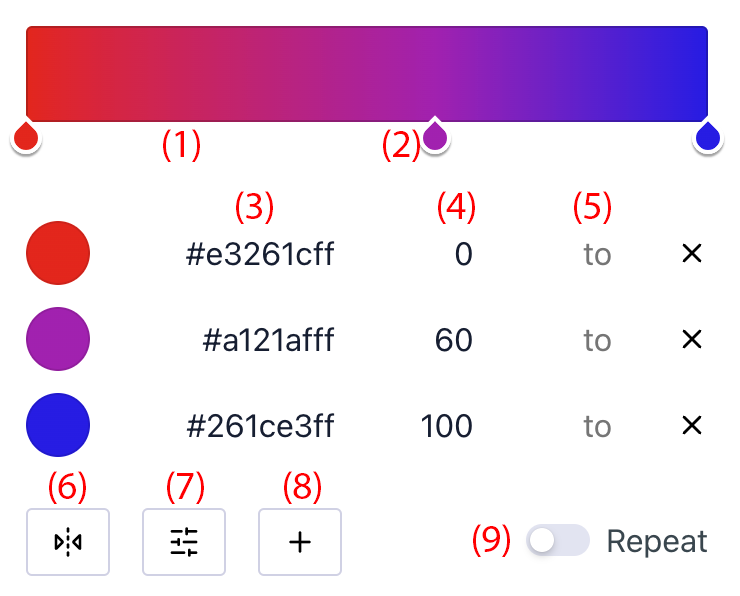
- Gradient preview
- Color Stop
- Hex value
- Start position
- End position (optional)
- Reverse gradient
- Edit gradient colors
- Add a new color
- Repeat gradient
Add a color stop
You can either click just below the gradient preview bar (1), or on the "+" button (8) below the color stops list.
Delete a color stop
You can either click on the color stop (2) and drag it below the gradient preview bar until it disappear, or on the "×" button in the list of the color stops.
Modify color
You can either double-click directly on the color stop (2), or click on the color representation in the stop list, or simply change its hexadecimal value (3) (with or without alpha channel).
Change all colors at once
In some cases, you might want to lighten the gradient, darken it, change its tint or even modify its opacity. To do so, click on the "Edit Colors" tool (7) below the list of the color stops.
Modify the start position
Click on the color stop and simply drag it to the right or left (2) or change its value (4) in the color stops list.
Modify the end position
By default, colors transition smoothly from one color stop to the next one. However, you might want to customize this behavior by changing the end point of a color stop.
Let's say you have two color stops: blue at 0% and magenta at 100%. The transition between these two colors currently runs from 0% to 100%.
If you want blue to occupy 50% of the gradient, you could add a new blue color stop starting at 50%. We would then have: blue at 0%, blue at 50% and magenta at 100%. Visually, the transition from blue to magenta would then take place between 50% and 100% of the gradient.
But there's a simpler way: in the color list, you can simply indicate the end of the position stop by specifying the optional "to" value (5). This would give us: blue [from 0% to 50%] and magenta at 100%.
You can use this behavior to your advantage to create a stripe effect by making the "start" value of a color stop the same as the previous "end" value (i.e. there will be no "transition" between colors, only hard lines).
Shortcuts
To use the following keyboard shortcuts, hover your mouse cursor over one of the color stops(2).
- Fill the color stop (until the next one): Ctrl + Click
- Unfill the color stop: Ctrl + Shift + Click
- Fill all the color stops: Alt + Ctrl + Click
- Unfill all the color stops: Alt + Ctrl + Shift + Click
- Move all the color stops (resize gradient): Alt + Drag
Repeat the colors
By default, colors transition from the first color stop to the last one on a 100% gradient line.
You can create a repeating effect by checking the "Repeat" box (9) below the color list and reducing the distance between the first and last color stops.
For example, suppose we have a gradient made up of several color stops, with the first one starting at 0% and the last one ending at 100%. If we wanted to create an effect in which the gradient repeated itself exactly twice, then we would have to divide the distance between the first and last color stops by 2. In other words, the last color stop would now end at 50%. Similarly, if we wanted to repeat it 5 times, we would have to divide the distance by 5, so that the last color stop would now end at 20%.
Background options
Background size
By default, this value is set to "auto", meaning that the size of the gradient automatically adapts to the parent container.
However, you can define a custom size by choosing from different length units (percent, pixel or rem).
Background repeat
By default, the background is set to be repeated along the horizontal and vertical axes.
If you select a custom gradient size, you'll be able to choose whether to repeat the gradient along its axis.
Background position
Changing the position will only be active and visible if you have set the size to a custom, non-repeating value (less than 100% of the viewport).
Except in rare cases, you'll probably never need to change the background coordinates.
Customizing the gradient
Blend Mode Tool
As we mentioned earlier, you can stack layers and play with opacity to create a unique final gradient. But there's something more powerful, which expand the ability to create even more stunning gradients: Like the Photoshop blending modes (Overlay, Darken, Multiply, Lighten, etc.), you can blend the layers with each other by clicking on the "blend mode" tool.